After building the Keg Tap Handle to monitor keg usage via an accelerometer, I wanted to try something different that would be more accurate and consistent with keg usage tracking. By building a scale to monitor the kegs weight, we can determine the liquid weight left in the keg and display that result somewhere. Of course, this scale can also be used to monitor any kind of tank around the house like propane or CO2. Rather than use the Arduino Cloud, I wanted to integrate this with Home Assistant and decided to use ESPHome. I took a lot of inspiration from The Hook Up's video on this project, but while he uses Tasmota to integrate with Home Assistant, we are going to use ESPHome.
It is worth noting that, like many of these projects, the accuracy is pretty good but it's not perfect. With the keg empty in my case, it showed about 10 oz remaining still. This is likely due to the foam left in the keg which will vary for each keg. In time, this can be adjusted to be more and more accurate. Also, with no weight on the scale, the weight fluctuates around 2-3 oz. This could be due to the quality of the load cells or how it was built, I'm not sure. Either way, having accuracy that is pretty close (within 1 or 2 beers) is good enough for me and is way better than just guessing.
Hardware
This build focuses on two different pieces of hardware. The main idea is that we are going to build a scale that integrates with Home Assistant via ESPHome. While you can see the measurements provided by the scale in Home Assistant through their app or the webpage, I wanted the values to always be visible by the keg itself. Therefore, I also used the 3D printed tap handle with a D1 Mini board and 128x64 OLED screen inside of it that I made for the Keg Tap Handle project to constantly display the values that are going to be also shown in Home Assistant. This is optional but I thought it was a nice touch and really helpful.
Hardware List:
Scale:
50 KG load cells (x4, includes amplifier)
Ideally a 3D printer to print the STL cases for the load cells, though not required
Plywood and a way to cut it, I used a jigsaw
An ESP8266 board
Micro USB data cable to power the board and flash it with ESPHome
Something to help calibrate the scale with like dumbbell weights but water bottles can work too.
A food scale could be helpful here to know the exact weight if using something like water bottles. It is also helpful to determine the weight of your tap handle which we will need later when creating templates in Home Assistant.
Tap Handle (optional):
Other helpful items would include a soldering iron, wire strippers for thin gauge wire, heat shrink tubing, electrical tape, and Dupont crimpers.
The first step is to cut out a piece of plywood for the keg to sit on. Since I will be using sixth barrel and quarter barrel kegs, I made sure to cut out a circle for the larger quarter barrel keg size which is about 12" in diameter. After that, we place the load cells on the plywood, trying to make them as even apart from each other as possible, but it doesn't have to be perfect. When placing the load cells on the plywood, make sure to first put the load cells into the 3D printed cases so they have room to flex and thus measure the weight put on them. If you don't have cases for them, you can use a chisel to cut out some room for the load cell so that it's cells can flex/deform a bit when weight is placed on them.

Ideally you can have the wires facing in to be more neat, but any way works
We then wire them in a wheatstone bridge circuit. To help set this up, you can label the load cells 1, 2, 3, and 4 in a clockwise rotation per the picture below. You can then draw arrows connecting them

We then want to connect the white wire from load cell 1 to the white wire from load cell 2. Then we connect the black wire from load cell 2 to the black wire on load cell 3. We follow the diagram by connecting the white wire from load cell 3 to the white wire on load cell 4. Last, we connect the black wire form load cell 4 to the black wire of load cell 1. I connected all the wires by soldering them together and then using electrical tape around the solder points. Alternatively you can use heat shrink tubing for a cleaner look.
We now have to use the remaining red wires from each load cell and hook them up to the amplifier that came with the load cells. For this, you can the Dupont crimper tool or solder them directly. You will be wiring it as follows:
Cell 1 to A-
Cell 2 to E+
Cell 3 to A+
Cell 4 to E-
We then have to wire the other side of the amplifier to the ESP8266 board. The diagram for this is below:

That's it! You should now have a scale that will soon be talking with your Home Assistant environment.
As previously mentioned, I will also be using the 3D printed tap handle to display the values from the scale. The hardware for this is mentioned in the Keg Tap Handle project post, so please refer to that article if you would like to do the same. In short, you just need to print out the STL of the tap handle, place the OLED screen and D1 Mini into it, and wire it up. We will then flash the D1 Mini via ESPHome which is listed below. The Keg Tap Handle post also utilizes an accelerometer, but that is not used for this project.
Software
Setup
On the software side of things, you will need Home Assistant. There are a lot of great resources for installing Home Assistant on to a Raspberry Pi or similar, but I use it in a VM on my ESXi host. This article also assumes you have ESPHome installed. The last thing to mention is that my Windows PC didn't initially recognize my board through ESPHome when plugged in. You can get the driver here. I used the "CP210x Windows Drivers with Serial Enumerator" download link. Also make sure your cable is a data cable and not just meant for charging.
Now that everything is set up, go to ESPHome and add a new device. The code is below for the scale as well as the tap handle display and I will go over the key parts for both of them. The first thing to do is plug the ESP8266 for your scale into your computer, and flash it with the code below in ESPHome. After doing this, you will likely have to go to Home Assistant's "Devices & Services" page under Settings to then "Configure"/add the new device found into ESPHome within your Home Assistant.
Note: I have changed out various encryption kegs in passwords with "xxxxxxxxxx" so please do not copy this part to your code.
esphome:
  name: scale
  friendly_name: scale

esp8266:
  board: nodemcuv2

# Enable logging
logger:

# Enable Home Assistant API
api:
  encryption:
    key: "xxxxxxxxxx"

ota:
  password: "xxxxxxxxxx"

wifi:
  ssid: !secret wifi_ssid
  password: !secret wifi_password

  # Enable fallback hotspot (captive portal) in case wifi connection fails
  ap:
    ssid: "Scale Fallback Hotspot"
    password: "xxxxxxxxxx"

captive_portal:

sensor:
  - platform: hx711
    name: "Keg Weight"
    dout_pin: D2
    clk_pin: D1
    gain: 128
    filters:
     - calibrate_linear:
         - -461041 -> 0
         - -216230 -> 320
    update_interval: 10s
    unit_of_measurement: oz
Calibration
After flashing the board with ESPHome, it should connect to your 2.5 GHz Wi-Fi. You can now start monitoring the logs also via ESPHome either wirelessly or through the cable you are using. Make sure no weight is on the scale. You will see numbers in the logs similar to this:
[10:42:32][D][hx711:031]: 'Keg Weight': Got value -461041
[10:42:32][D][sensor:093]: 'Keg Weight': Sending state 384.80295 oz with 0 decimals of accuracy
Notice the number I bolded. This is going to be your "zero" number that you are going to put in under "calibrate_linear" in the code that you just copy and pasted. Now, put some weight on it in which you know the exact weight you are adding. You can use dumbbells or even bottled water. I added 20 pounds worth of weight to the scale with dumbbell weights which is 320 ounces, which is what I want the measurements to be in. You can see in the code where I added these numbers. The calibrate_linear function will take these two (or more) measurements and then create a calibration with these, so we are now good to go here.
Home Assistant Sensors
We now have to configure sensors in Home Assistant to take the value of scale and to make them useful for tracking. I created various sensors with templates which are:
Liquid weight, quarter keg
Percent remaining, quarter keg
Pints remaining, quarter keg
Liquid weight, sixth keg
Percent remaining, sixth keg
Pints remaining, sixth keg
Scale weight in pounds
Because we will be using sixth barrel and quarter barrel kegs, we need to get different measurements for these. I created a Home Assistant helper toggle to differentiate between these values which I will talk about in the later sections if you choose to use the tap handle to monitor values like I did.
The code for all of the templates is below, and I will explain parts of them afterwards:
sensor:

  - platform: template
    sensors:
      keg_quarter_liquid_weight:
        unique_id: keg_liquid_weight_sensor
        friendly_name: "Keg Quarter Liquid Weight"
        value_template: "{{ (states('sensor.kegscale_keg_weight') | float - 383) }}"
        unit_of_measurement: "oz"

  - platform: template
    sensors:
      keg_quarter_percent_remaining:
        friendly_name: "Keg Quarter Percent Remaining"
        unique_id: keg_quarter_percent_remaining_sensor
        value_template: "{{ (( (states('sensor.keg_quarter_liquid_weight') | float(0) ) / 1040) * 100 ) | round(0) }}"
        unit_of_measurement: "%"

  - platform: template
    sensors:
      keg_quarter_pints_remaining:
        unique_id: keg_quarter_pints_remaining_sensor
        friendly_name: "Keg Quarter Pints Remaining"
        value_template: "{{ (states('sensor.keg_quarter_liquid_weight') | float / 16.8) | round(0) }}"
        unit_of_measurement: "Pints"


  - platform: template
    sensors:
      keg_sixth_liquid_weight:
        unique_id: keg_sixth_liquid_weight_sensor
        friendly_name: "Keg Sixth Liquid Weight"
        value_template: "{{ (states('sensor.kegscale_keg_weight') | float - 295) }}"
        unit_of_measurement: "oz"

  - platform: template
    sensors:
      keg_sixth_percent_remaining:
        unique_id: keg_sixth_percent_remaining_sensor
        friendly_name: "Keg Sixth Percent Remaining"
        value_template: "{{ (( (states('sensor.keg_sixth_liquid_weight') | float(0) ) / 664) * 100 ) | round (0) }}"
        unit_of_measurement: "%"

  - platform: template
    sensors:
      keg_sixth_pints_remaining:
        unique_id: keg_sixth_pints_remaining_sensor
        friendly_name: "Keg Sixth Pints Remaining"
        value_template: "{{ (states('sensor.keg_sixth_liquid_weight') | float / 16.8) | round (0) }}"
        unit_of_measurement: "Pints"

  - platform: template
    sensors:
      keg_scale_weight_pounds:
        unique_id: keg_scale_weight_pounds
        friendly_name: "Keg Scale Weight Pounds"
        unit_of_measurement: "lb"
        value_template: "{{ (states('sensor.kegscale_keg_weight') | float / 16 ) | round (1)  }}"
Explanation Of Sensors:
Below are the explanations of the sensors. If you are comfortable with templates/sensors and want to skip this part that is fine, but it is worth reading the first sensor description to see why we are doing certain things with the math which you may not have thought of:
Keg Quarter Liquid Weight:
  - platform: template
    sensors:
      keg_quarter_liquid_weight:
        unique_id: keg_liquid_weight_sensor
        friendly_name: "Keg Quarter Liquid Weight"
        value_template: "{{ (states('sensor.kegscale_keg_weight') | float - 383) }}"
        unit_of_measurement: "oz"
This sensor takes the weight of the scale, makes it a float, and subtracts 383 ounces from it. Why 383? Well this is a quarter keg which, when empty, weighs 352 ounces. So why 383? Well because the tap handle itself, which is also on top of the keg, weights another 31 ounces. This math is used for the sixth barrel keg as well, just with a slightly different weight of course. (For the sixth barrel, an empty keg weighs 16.5 lb or 264 oz. Adding a 31 oz tap, the total for the template will be 295.) Your keg tap handle may be different though and is worth weighing first. It is also worth noting that I added a unique_id to the templates so that you can more easily manage the sensors readout through the Home Assistant web interface.
Keg Quarter Percent Remaining:
  - platform: template
    sensors:
      keg_quarter_percent_remaining:
        friendly_name: "Keg Quarter Percent Remaining"
        unique_id: keg_quarter_percent_remaining_sensor
        value_template: "{{ (( (states('sensor.keg_quarter_liquid_weight') | float(0) ) / 1040) * 100 ) | round(0) }}"
        unit_of_measurement: "%"
This sensor now takes data from the sensor we just created. We use the liquid weight in the scale and divide it by 1040. For reference, a quarter keg weights 87 lb when full and 22 lb when empty. 87 lb - 22 lb is 65 lb or 1040 oz. Therefore, the liquid weighs 1040 oz. We then use the " | round (0)" to round this percent to the nearest whole number. If preferred, you can adjust this to something like " | round(2)" to round it to the nearest hundredth decimal instead. The tap handle doesn't have to be included in this measurement since the +31 oz it weights remains static weather the keg is empty or full.
Keg Quarter Pints Remaining:
  - platform: template
    sensors:
      keg_quarter_pints_remaining:
        unique_id: keg_quarter_pints_remaining_sensor
        friendly_name: "Keg Quarter Pints Remaining"
        value_template: "{{ (states('sensor.keg_quarter_liquid_weight') | float / 16.77) | round(0) }}"
        unit_of_measurement: "Pints"
This sensor again takes the liquid weight remaining in the keg and simply divides this value by 16.77. Because we are taking a weight in ounces and then determining how many fluid ounces are left, it is not simply a division by 16, although it is close. This formula again gets rounded to the nearest whole number.
Keg Scale Weight Pounds:
  - platform: template
    sensors:
      keg_scale_weight_pounds:
        unique_id: keg_scale_weight_pounds
        friendly_name: "Keg Scale Weight Pounds"
        unit_of_measurement: "lb"
        value_template: "{{ (states('sensor.kegscale_keg_weight') | float / 16 ) | round (1)  }}"
While not entirely necessary, this sensor is simply a conversion from pounds to ounces as I found myself curious of the conversion when looking at the numbers often. I chose to round this to the nearest tenth of a decimal as well.
Note that I did not list an explanation of the sixth barrel keg sensors as they are essentially the same as the quarter barrel keg numbers just with different math being done.
Also Note: In my experience some kegs weigh differently than the numbers found online. Once you have your initial keg set up, take note of the total weight your scale is reading with any additional hardware attached to it (tap, hoses, etc - let's say it weighs 1040). Then take note of the keg again when there is no beer left (let's say this one weighs 325 oz). Use these numbers to further calibrate the sensors for accuracy. For example, in your Home Assistant config where you list sensors, "keg_sixth_liquid_weight" may now subtract 325 instead of 375 if you found that the total weight of your empty keg is 325 and not the internet noted 375. You would also then change the "keg_sixth_percent_remaining" sensor to divide by the new liquid weight of a full keg which may change from something like 664 to 715 (since 1040 - 325 = 715). Keg weight may change slightly and your mileage may vary. Regardless, as stated earlier, this project will still provide pretty accurate numbers, usually within a beer or two.
At this point, the scale is done and should be usable if you just plan on using your phone or computer to check the values on Home Assistant. If you would like to use the tap handle to constantly display the values then continue reading below.
Tap Handle Monitoring
Home Assistant Helpers:
Before we do anything, we need to make a few helpers in Home Assistant (Settings > Devices & Services > Helpers (top bar)).
Create a Toggle named quarterkeg (I used mdi:keg for an icon).
Create a Toggle named oledtoggle (I used mdi:monitor-star for an icon).
Create a Button named new_keg (I used mdi:new-box for an icon).
Create a Button named keg_is_empty (I used mdi:gauge-empty) for an icon).
Adding a device in ESPHome:
Now, after installing the D1 Mini and OLED board inside the printed out tap handle as previously mentioned, you are going to want to flash the board in ESPHome similar to the scale. The code for the tap handle is below and again, I will explain different parts of it below that.
Note: I have changed out various encryption kegs in passwords with "xxxxxxxxxx" so please do not copy this part to your code.
esphome:
  name: kegtaphandle
  friendly_name: KegTapHandle

esp8266:
  board: d1_mini

# Enable logging
logger:

# Enable Home Assistant API
api:
  encryption:
    key: "xxxxxxxxxx"

ota:
  password: "xxxxxxxxxx"

wifi:
  ssid: !secret wifi_ssid
  password: !secret wifi_password


  # Enable fallback hotspot (captive portal) in case wifi connection fails
  ap:
    ssid: "Kegtaphandle Fallback Hotspot"
    password: "xxxxxxxxxx"

captive_portal:


# Enable I2C bus for OLED display
i2c:
  sda: D2
  scl: D1
  scan: True

font:
  - file: 'slkscr.ttf'
    id: font1
    size: 15

  - file: 'slkscr.ttf'
    id: font2
    size: 50

  - file: 'slkscr.ttf'
    id: font3
    size: 8


# Declare the sensor component
sensor:
  - platform: homeassistant
    id: keg_quarter_percent_remaining
    entity_id: sensor.keg_quarter_percent_remaining

    on_value:
      then:
        - logger.log:
            format: "Received: %f"
            args: ['id(keg_quarter_percent_remaining).state']

  - platform: homeassistant
    id: keg_quarter_pints_remaining
    entity_id: sensor.keg_quarter_pints_remaining

  - platform: homeassistant
    id: keg_sixth_pints_remaining
    entity_id: sensor.keg_sixth_pints_remaining

  - platform: homeassistant
    id: keg_sixth_percent_remaining
    entity_id: sensor.keg_sixth_percent_remaining

binary_sensor:
  - platform: homeassistant
    id: keg_size_quarter
    entity_id: input_boolean.quarterkeg


text_sensor:
  - platform: homeassistant
    id: display_toggle
    entity_id: input_boolean.oledtoggle
    on_value:
      then:
        - display.page.show: !lambda |-
                                      if (id(display_toggle).state == "on") {
                                        return id(one);
                                      } else {
                                        return id(two);
                                      }


# Declare the OLED display component
display:
  - platform: ssd1306_i2c
    model: "SSD1306 128x64"
    address: 0x3C
    id: oled_display
    update_interval: 2s
    pages:
      - id: one
        lambda: |-
          if (id(keg_size_quarter).state) {
          it.printf(64, 0, id(font1), TextAlign::TOP_CENTER, "%.0f Beers", id(keg_quarter_pints_remaining).state);
          it.printf(64, 32, id(font2), TextAlign::CENTER, "%.0f%%", id(keg_quarter_percent_remaining).state);
          it.printf(64, 62, id(font3), TextAlign::BASELINE_CENTER, "Quarter Keg");
          } else {
          it.printf(64, 0, id(font1), TextAlign::TOP_CENTER, "%.0f Beers", id(keg_sixth_pints_remaining).state);
          it.printf(64, 32, id(font2), TextAlign::CENTER, "%.0f%%", id(keg_sixth_percent_remaining).state);
          it.printf(64, 62, id(font3), TextAlign::BASELINE_CENTER, "Sixth Keg");
          }
      - id: two
        lambda: |-
          it.fill(COLOR_OFF);
Initially the code was a bit simpler with the display always just showing either the values from a quarter keg or a sixth keg, depending on the state of the helper toggle previously created. However, I was worried that over time the OLED would burn in. Therefore, I wanted a way to turn off the screen at night when the keg is not being used.
Detailed Code Breakdown:
After the core ESPHome variables set up, we enable the OLED screen on the proper board pins and include 3 fonts with various sizes to use on the OLED display. ESPHome also lets you add different fonts to your configuration to customize this further (more info here):
# Enable I2C bus for OLED display
i2c:
  sda: D2
  scl: D1
  scan: True

font:
  - file: 'slkscr.ttf'
    id: font1
    size: 15

  - file: 'slkscr.ttf'
    id: font2
    size: 50

  - file: 'slkscr.ttf'
    id: font3
    size: 8
Next we have to declare the sensors. The "logger.log" part of one sensor is for troubleshooting and is just displays the value we are seeing in the logs. This part is optional to include but I found it useful at times. Note that we are using "sensor" and "binary_sensor" for the different types of sensors in Home Assistant. We are reading the "sensor" values later as floats and we are reading the "binary_sensor" value as a true or false for the helper boolean toggle we made earlier. We also have a "text_sensor" for the other helper boolean toggle we made.
# Declare the sensor component
sensor:
  - platform: homeassistant
    id: keg_quarter_percent_remaining
    entity_id: sensor.keg_quarter_percent_remaining

    on_value:
      then:
        - logger.log:
            format: "Received: %f"
            args: ['id(keg_quarter_percent_remaining).state']

  - platform: homeassistant
    id: keg_quarter_pints_remaining
    entity_id: sensor.keg_quarter_pints_remaining

  - platform: homeassistant
    id: keg_sixth_pints_remaining
    entity_id: sensor.keg_sixth_pints_remaining

  - platform: homeassistant
    id: keg_sixth_percent_remaining
    entity_id: sensor.keg_sixth_percent_remaining

binary_sensor:
  - platform: homeassistant
    id: keg_size_quarter
    entity_id: input_boolean.quarterkeg


text_sensor:
  - platform: homeassistant
    id: display_toggle
    entity_id: input_boolean.oledtoggle
    on_value:
      then:
        - display.page.show: !lambda |-
                                      if (id(display_toggle).state == "on") {
                                        return id(one);
                                      } else {
                                        return id(two);
                                      }
For the "text_sensor" specifically, we are showing either "page one" or "page two" of the display that we specify right below this part of the code. Page one is normal functionality which shows all of the values we want to display. Page two shows nothing and instead and essentially turns the screen off so that we can prevent OLED burn-in. The pages are toggled with a helper toggle display we made earlier, and we will later create automations to turn the screen on and off at certain times when the keg will not likely be used.
The last part of the code is the display. We use another lambda function here to check the helper toggle we made earlier to see if we should display values for a quarter barrel keg or a sixth barrel keg. As noted previously, we also see the pages in which to display which is controlled by the previous "text_sensor" boolean toggle above:
# Declare the OLED display component
display:
  - platform: ssd1306_i2c
    model: "SSD1306 128x64"
    address: 0x3C
    id: oled_display
    update_interval: 2s
    pages:
      - id: one
        lambda: |-
          if (id(keg_size_quarter).state) {
          it.printf(64, 0, id(font1), TextAlign::TOP_CENTER, "%.0f Beers", id(keg_quarter_pints_remaining).state);
          it.printf(64, 32, id(font2), TextAlign::CENTER, "%.0f%%", id(keg_quarter_percent_remaining).state);
          it.printf(64, 62, id(font3), TextAlign::BASELINE_CENTER, "Quarter Keg");
          } else {
          it.printf(64, 0, id(font1), TextAlign::TOP_CENTER, "%.0f Beers", id(keg_sixth_pints_remaining).state);
          it.printf(64, 32, id(font2), TextAlign::CENTER, "%.0f%%", id(keg_sixth_percent_remaining).state);
          it.printf(64, 62, id(font3), TextAlign::BASELINE_CENTER, "Sixth Keg");
          }
      - id: two
        lambda: |-
          it.fill(COLOR_OFF);
The lambda functionality is certainly the most confusing part of working with ESPHome in my opinion, but it is powerful. As you can see, we use the lambda function to check if the "keg_size_quarter" toggle has a state, e.g. if it is toggle on. If it is, we display values that end up looking like this:
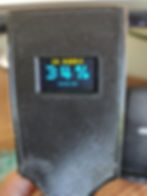
As you can see, we are using font 1 (our "medium" sized font) to display the number of beers on the top of the screen, font 2 (our "large" font) for the main value which will be the percent remaining in the middle of the screen, and font 3 (our "small" font) to show which size keg we are using just as a reminder that we need to toggle our helper in Home Assistant if the values look odd.
A few things to point out here:
"%.0f Beers" is saying print the value of a float (%f) rounded to a whole number (.0) here with the word "Beers" after it.
"TextAlign::TOP_CENTER" is self explanatory, but the previous numbers of (64, 0) may be less obvious. These are the anchor points for the text. Because our screen is 128 pixels wide by 64 pixels tall, we are anchoring this text in the middle horizontally (64 pixels), and at the corner vertically (0 pixels), so the TextAlign can then work it's magic by formatting it in the "TOP_CENTER" from that information.
Home Assistant Automations:
To help prevent burn-in on the OLED screen in the tap handle, I wanted to turn the screen off at night when the keg likely isn't being used. The values, of course, can always be seen otherwise in Home Assistant 24/7. I created two simple automations that will turn the OLED off at night and on in the morning. I also created an automation for the button helpers we made previously which, on an empty keg, will disable these automations and turn the OLED off since there is no need to have the screen on when the keg isn't ever being used. The "new keg" button will do the opposite - it will enable the OLED screen again and enable the automations. Below are the YAML before all of the automations:
Turn off OLED at 11 PM:
alias: Turn off OLED Screen on Keg Tap Handle every night at 11 pm
description: ""
trigger:
  - platform: time
    at: "23:00:00"
condition: []
action:
  - service: input_boolean.turn_off
    data: {}
    target:
      entity_id: input_boolean.oledtoggle
mode: single
Turn on OLED at 10:30 AM:
alias: Turn on OLED Screen on Keg Tap Handle every morning at 10:30 am
description: ""
trigger:
  - platform: time
    at: "10:30:00"
condition: []
action:
  - service: input_boolean.turn_on
    data: {}
    target:
      entity_id: input_boolean.oledtoggle
mode: single
Empty Keg button automation:
alias: When Keg Is Empty button pressed, disable OLED and OLED automations
description: ""
trigger:
  - platform: state
    entity_id:
      - input_button.keg_is_empty
condition: []
action:
  - service: automation.turn_off
    data:
      stop_actions: true
    target:
      entity_id:
        - >-
          automation.turn_off_oled_screen_on_keg_tap_handle_every_night_at_midnight
        - automation.turn_on_oled_screen_on_keg_tap_handle_every_morning_at_8_am
  - service: input_boolean.turn_off
    data: {}
    target:
      entity_id: input_boolean.oledtoggle
mode: single
New Keg button automation:
alias: When New Keg button pressed, enable OLED and OLED automations
description: ""
trigger:
  - platform: state
    entity_id:
      - input_button.new_keg
condition: []
action:
  - service: automation.turn_on
    data: {}
    target:
      entity_id:
        - >-
          automation.turn_off_oled_screen_on_keg_tap_handle_every_night_at_midnight
        - automation.turn_on_oled_screen_on_keg_tap_handle_every_morning_at_8_am
  - service: input_boolean.turn_on
    data: {}
    target:
      entity_id: input_boolean.oledtoggle
mode: single
Conclusion
I hope you enjoyed this article and found it helpful. Below I will show some pictures of the final product and an example dashboard (with YAML) that I used in Home Assistant. I found it best to create a dashboard with three views. One being the "main" view with all different information that included the helper toggles and buttons and then one view for each keg size - quarter and sixth.


views:
  - title: Main
    icon: ''
    badges: []
    cards:
      - type: entities
        entities:
          - entity: input_boolean.oledtoggle
          - entity: input_boolean.quarterkeg
          - entity: input_button.keg_is_empty
          - entity: input_button.new_keg
      - type: entities
        entities:
          - entity: sensor.keg_quarter_liquid_weight
          - entity: sensor.keg_quarter_percent_remaining
          - entity: sensor.keg_quarter_pints_remaining
          - entity: sensor.keg_sixth_liquid_weight
          - entity: sensor.keg_sixth_percent_remaining
          - entity: sensor.keg_sixth_pints_remaining
          - entity: sensor.kegscale_keg_weight
          - entity: sensor.keg_scale_weight_pounds
        state_color: false
  - title: 'Quarter '
    path: displays
    badges: []
    cards:
      - type: gauge
        entity: sensor.keg_quarter_percent_remaining
        needle: true
        severity:
          green: 80
          yellow: 20
          red: 0
      - type: entities
        entities:
          - entity: sensor.keg_quarter_liquid_weight
          - entity: sensor.keg_quarter_percent_remaining
          - entity: sensor.keg_quarter_pints_remaining
        state_color: false
        title: Quarter Keg
      - type: history-graph
        entities:
          - entity: sensor.keg_quarter_liquid_weight
        hours_to_show: 336
      - type: entities
        entities:
          - sensor.kegscale_keg_weight
          - sensor.keg_scale_weight_pounds
  - title: 'Sixth '
    path: sixth-keg
    badges: []
    cards:
      - type: gauge
        entity: sensor.keg_sixth_percent_remaining
        needle: true
        severity:
          green: 80
          yellow: 20
          red: 0
      - type: entities
        entities:
          - entity: sensor.keg_sixth_liquid_weight
          - entity: sensor.keg_sixth_percent_remaining
          - entity: sensor.keg_sixth_pints_remaining
        state_color: false
        title: Sixth Keg
      - type: history-graph
        entities:
          - entity: sensor.keg_sixth_liquid_weight
        hours_to_show: 336
      - type: entities
        entities:
          - sensor.kegscale_keg_weight
          - sensor.keg_scale_weight_pounds
title: Keg Information